Month: May 2020

Separation Toilet

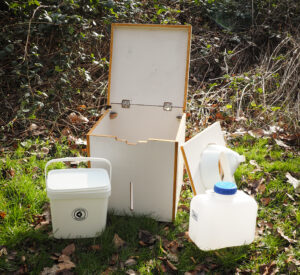
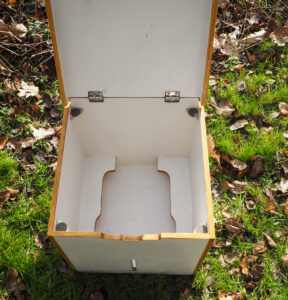
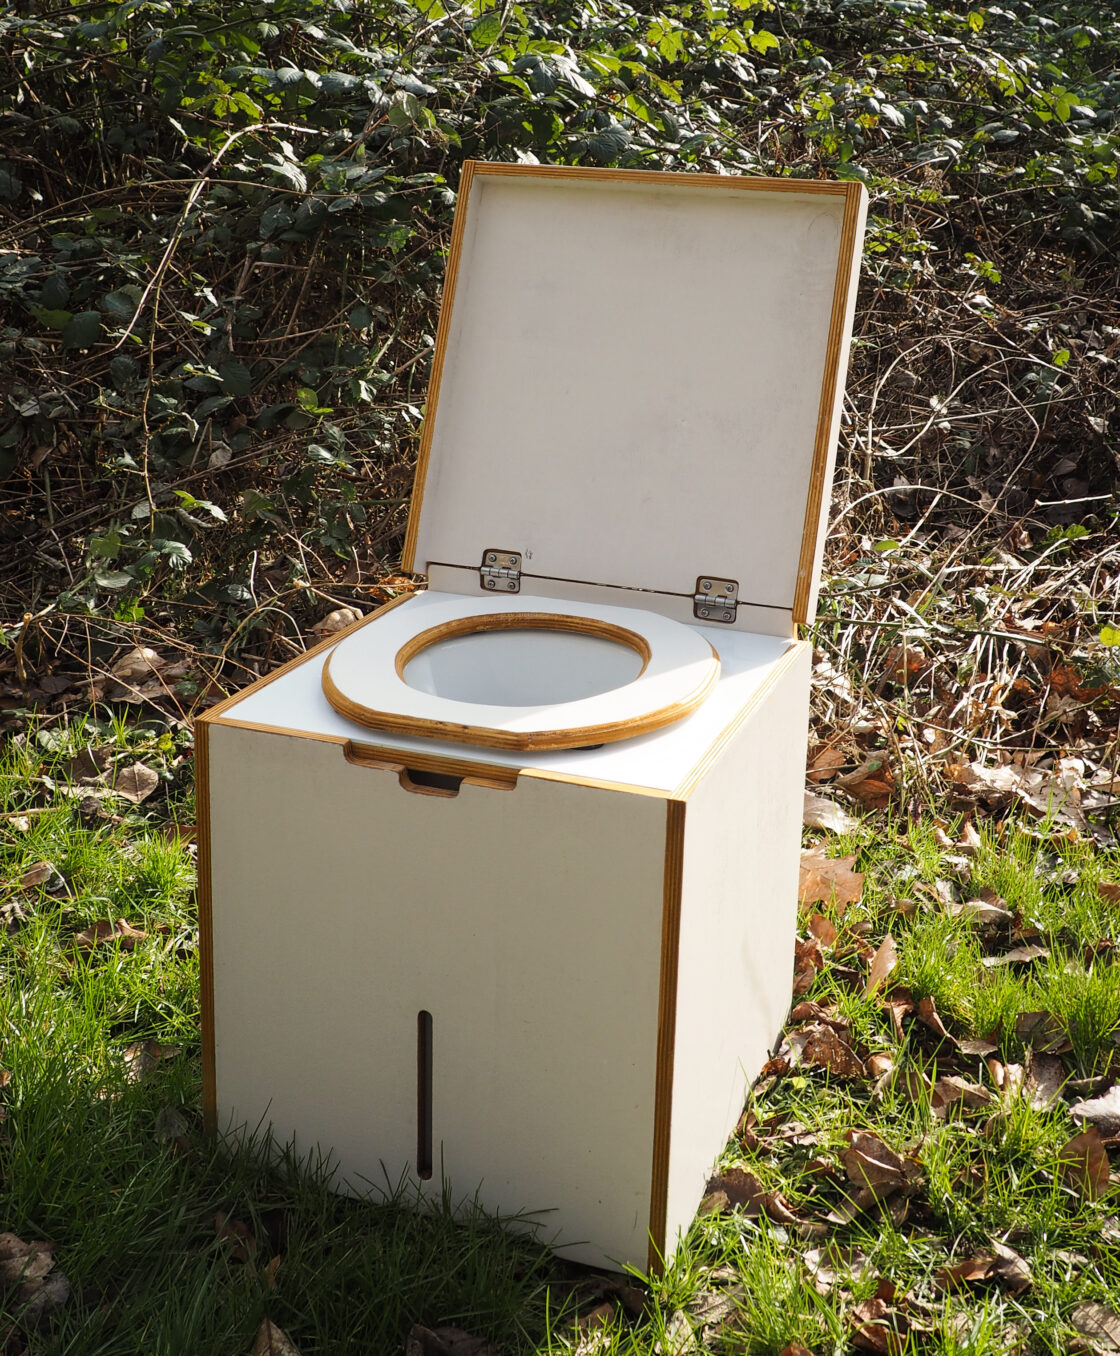
A separation toilet is a very environmentally friendly way of doing one’s business, as neither chemicals nor water are needed. With a separation toilet, as the name suggests, liquid is separated from solid.

Through a special separator insert, the pee is directed through the front part into a canister. Everything solid falls into a container in the rear part, into which you scatter a handful of wood chips or earth after each bowel movement. This removes moisture from the solids, preventing foul odors. To play it safe odor-wise, we also put an air vent to direct odors outside.

We built our separation toilet with a separation insert, from the Kildwick company. It is designed like this, that it works equally well and clean for men and women. Due to the manufacture of high-quality, robust and at the same time recyclable polystyrene, the Kildwick urine separator has extremely smooth surfaces on which germs and bacteria do not find a breeding ground. Above all, this makes cleaning easier.

Warm through the winter

Since we will be living in the bus year round and traveling to different climates, a sophisticated heating system is a good requirement.

We chose a combination of a small storage furnace (cast iron) with fresh air supply and underfloor heating with 2 heating circuits.

A floor heater would have been the easier option, of course, but we want a heater that we can run on renewable resources, in this case wood, rather than gas or gasoline/diesel. With the underfloor heating, we had a clear extra expense during installation. We had to mill joints in the floor insulation, lay the pipes as tightly as possible in the joints, install a heating circuit distributor, attach a 60 liter boiler as heat storage, and and and…. Translated with www.DeepL.com/Translator (free version)

This meant that we not only had more work, but also a significant increase in weight. That’s just how everyone has their priorities.

Besides the sustainability factor, this heating system has the further advantage that it can also heat our shower/domestic water. Through the copper spiral, which winds around the stove pipe, the water flows out of the boiler and is thus heated. Because the boiler is placed higher than the stove, the water flows without a pump. Only by natural convection, the heated water, due to its lower density in the boiler rises upwards, while at the same time the colder water from the boiler sinks down another pipe to the stove pipe.


The heated water is transported from the boiler through the pipes of the underfloor heating system by means of a pump and thus distributes the heat throughout the entire bus via the floor. After passing through the floor, the cooled water returns to the boiler and, due to its greater density, flows directly to the stove pipe to be heated.

There is also the possibility to heat our shower / domestic water. For this purpose, the warm water from the boiler is pumped through the heat exchanger into our electric boiler and heats the 20l of water there.

Our conclusion is: The effort to install a wood stove and underfloor heating in a bus is of course enormous, but for our needs this heating system is ideal. And honestly, what could be nicer than sitting by the stove in the evening and looking into the crackling fire?


Power supply

One of the first and most relevant steps in planning the PV system was to create an annual profile of our supposed electricity consumption. To do this, we noted the nominal power (watts) and the respective duty cycle of our consumers over the course of the day, taking into account the different seasons. If we then multiply the number of consumers by power and operating time, we get the energy consumption in watt-hours.

For example: 4 energy-saving lamps consume 10 watts each and are in operation for 5 hours a day.

4x10x5= 200 Watt hours

After determining our approximate power needs, we still had to figure out the maximum load for the right choice of batteries and inverter. How many watts do we consume when almost all devices are switched on at the same time?

Due to the fact that we heat our water with the water-bearing wood stove in the winter and only turn on the electric heater in the boiler in the summer when there is enough power available, our power consumption is relatively low. Also the maximum load will not be too high, because we have mainly battery devices.

Nevertheless, our bus will rarely make the acquaintance of a shore power connection, as our destinations tend to be remote locations far from campgrounds. Accordingly, our power supply must function completely self-sufficiently in every situation.

The winter, or bad weather, when the sun refuses to come for a few days, can not really be avoided. To be prepared for this eventuality, we need to store the necessary energy. For this we have installed two Victron Energy 12V 220Ah Deep CycleGel batteries. These batteries are durable, powerful, and do not outgas. A lithium battery would of course have been lighter and could have been discharged deeper, but the ease of flammability, destructive degradation and lack of recycling methods, put us off.

On our roof there are 6 solar modules with 240 watts each. These are divided into two strings in order to still generate energy even if the roof is partially shaded. The generated energy is managed by 2 solar charge controllersand fed into the batteries.

The two 12-volt batteries are connected in series to create a 24-volt electrical system. A voltage of 24 volts results in a thinner cable cross-section in the DC area than with a 12 volt network, which in turn saves space and money.

But since we want to have an electrical system in our bus like in the house, to be able to use normal lamps, sockets and other devices, we need an inverter that converts the direct current into alternating current (or transforms the voltage from 24 to 220 volts).

Now the electrical installation must be appropriately fused. If a short circuit occurs, only the fuse blows and not the cable.

In the case of a 220 volt network, personal protection is also required. The RCD has the task of switching off an electrical consumer within 0.2 s if it has a fault and a touch voltage that is dangerous for persons occurs.

A professional electrical installation and the associated protection, is very important to us, because in case of doubt it can be about our lives. Therefore, we have discussed this project piece by piece with a specialist from the company “Green Akku”and had it approved by an electrician before use.

The underfloor heating

By now it was January and we finally had the insulation done!

But before we could cover the walls and lay the floor, we had to lay some pipes…

First of all, we took care of the pipes for the underfloor heating (sounds decadent but in the end it is a relatively cheap and quite sustainable heating system). In order to lay the aluminum composite pipe stably and effectively in the floor, we milled the track in which the pipe should lie into the Styrodur with the router. Now the pipe was squeezed into the track so that it protruded about a millimeter, so that afterwards it would directly touch the floorboard to achieve maximum foot warmth.

With the remaining aluminum composite pipe we laid the water pipes in the shower and kitchen.

The next step was to lay all the power lines. A topic that I am not particularly comfortable with, but fortunately Julian has enough experience and knowledge and always kept track despite all the cables. We laid 2.5 square, fine wire for 13 sockets and 3 light switches across the bus.

We have placed the cables in protective tubes to protect them from external influences.To make them insensitive to vibration, we have also fixed them at regular intervals, with clamps.

The Insulation

We spent several weeks trying to get the bus sealed properly. It was dripping in so many places that we couldn’t figure out where exactly the water was coming from, so we decided to seal every single joint and rivet with body glue. After passing a test with the Kärcher, the next step was to protect the interior from rust in the long run. Using Ovatrol, Pellox and special rust-proofing paints, we treated the entire interior to remove existing rust and make the body resistant to rust in the future.


In the meantime, it was already November and began to freeze at night, so that icicles hung from the ceiling even in the bus. If you turned on the oven in the morning to have a reasonably comfortable temperature to work, of course the ice thawed and the entire bus was soaking wet. There was no way it could go on like this! We had to insulate… As we know, when cold air meets warm air, condensation occurs, which of course we definitely don’t want, otherwise our bus will become a dripstone cave. So we have to move the dew point to the outside with the help of insulation. Sounds quite simple at first… I would have loved to insulate with natural materials such as wood or sheep’s wool, but unfortunately these are not very suitable for steel walls because they absorb water, causing the coach to rust and our wooden interior to rot. Accordingly, we unfortunately had to use insulation made of synthetic material. Fortunately, we were able to buy polyethylene foam insulation mats, also known as trocellen, as a waste product from a company. These were mats that were dirty and partially damaged. However, we didn’t care about that at all. We spent the next three weeks applying the Trocellen to the walls and ceiling with Pattex kraft glue (smelly devil stuff). We insulated a total of three layers, which is about 4 inches. After the walls came the floor! We wanted to insulate the floor with Styrodur and searched for used Styrodur for a long time, but never found enough. Until we noticed that the cold store on our property, which is to be demolished anyway, is insulated with 8cm Styrodur panels. These we have directly reused and insulated our floor….